In our previous article How RabbitMQ Works: Standard Message Flow and Routing Types, we explored what RabbitMQ is and how it works. Now, let’s put that knowledge into practice by implementing messaging in Spring Boot. We will create two projects—one for sending messages (the producer) and one for receiving them (the consumer).
1. What We Are Doing
In this example, we implement a monitoring solution for devices. The producer sends messages containing device status information using dynamic routing keys (such as monitoring.laptop, monitoring.phone, and monitoring.tablet). The consumer subscribes to corresponding queues and receives these messages.
2. Technologies Used
Our projects leverage the following technologies and tools:
- Spring AMQP – Provides integration with RabbitMQ for messaging.
- RabbitMQ – Acts as the message broker to route and transmit messages.
Both projects share common dependencies as defined in the pom.xml:
<dependencies>
    <dependency>
        <groupId>org.springframework.boot</groupId>
        <artifactId>spring-boot-starter-amqp</artifactId>
    </dependency>
    <dependency>
        <groupId>org.springframework.boot</groupId>
        <artifactId>spring-boot-starter-test</artifactId>
        <scope>test</scope>
    </dependency>
    <dependency>
        <groupId>org.springframework.amqp</groupId>
        <artifactId>spring-rabbit-test</artifactId>
        <scope>test</scope>
    </dependency>
</dependencies>
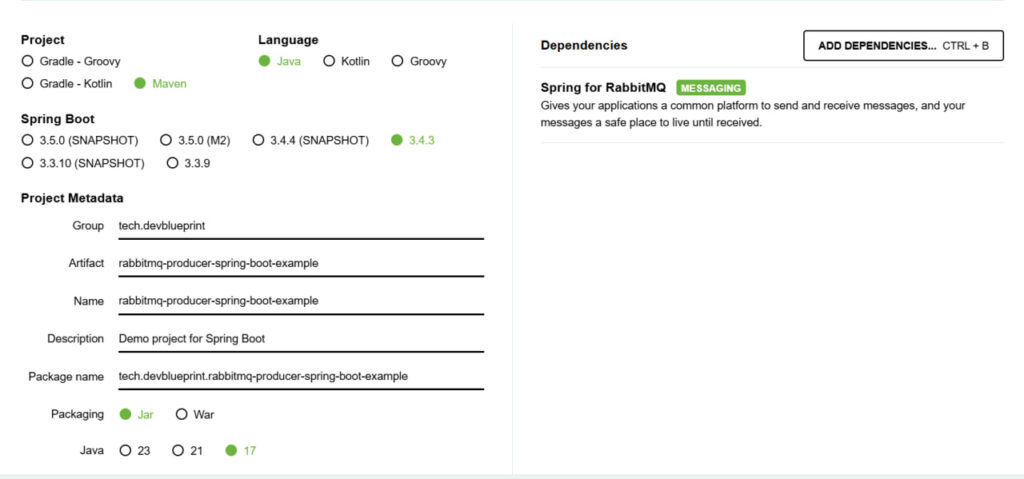
3. Project Setup
Both the producer and consumer projects are created using the Spring Initializr. When setting up your projects, be sure to add the Spring AMQP dependency to enable RabbitMQ support.
Additionally, to run RabbitMQ, you can quickly set up a broker using Docker. Use the following command to start RabbitMQ with the management plugin:
docker run -d --hostname devblueprint-rabbit --name devblueprint-rabbit-mq -p 5672:5672 -p 15672:15672 rabbitmq:3-management
This command does the following:
- Runs RabbitMQ in a detached mode.
- Sets a custom hostname (
devblueprint-rabbit) and container name (devblueprint-rabbit-mq). - Maps port 5672 (for AMQP protocol) and 15672 (for the management interface) from the container to your local machine.
- Uses the
rabbitmq:3-managementimage, which includes the RabbitMQ management plugin for easier monitoring and management.
4. Project Implementation
Producer Project
Key Components:
RabbitMQConfig.class (Producer Configuration):
package tech.devblueprint.rabbitmq_producer_spring_boot_example.configuration;

import org.springframework.amqp.core.TopicExchange;
import org.springframework.context.annotation.Bean;
import org.springframework.context.annotation.Configuration;

@Configuration
public class RabbitMQConfig {

    public static final String EXCHANGE_NAME = "monitoring.exchange";

    // Create a topic exchange
    @Bean
    public TopicExchange topicExchange() {
        return new TopicExchange(EXCHANGE_NAME);
    }
}
This configuration class defines a Topic Exchange with the name monitoring.exchange. The exchange is responsible for routing messages based on specific routing keys, which allows the producer to target messages to different consumer queues.
MessageProducer.class (Message Sending Service):
package tech.devblueprint.rabbitmq_producer_spring_boot_example.producer;

import org.springframework.amqp.rabbit.core.RabbitTemplate;
import org.springframework.stereotype.Service;
import tech.devblueprint.rabbitmq_producer_spring_boot_example.configuration.RabbitMQConfig;

@Service
public class MessageProducer {

    private final RabbitTemplate rabbitTemplate;

    public MessageProducer(RabbitTemplate rabbitTemplate) {
        this.rabbitTemplate = rabbitTemplate;
    }

    // Sends a monitoring message using a specific routing key
    public void sendMessage(String routingKey, String message) {
        rabbitTemplate.convertAndSend(RabbitMQConfig.EXCHANGE_NAME, routingKey, message);
    }
}
This service encapsulates the logic for sending messages. It uses Spring’s RabbitTemplate to send a message by taking a routing key and a message string as input and then publishing the message to the defined exchange.
ScheduledMessageSender.class (Scheduled Message Sender):
package tech.devblueprint.rabbitmq_producer_spring_boot_example.producer;

import org.slf4j.Logger;
import org.slf4j.LoggerFactory;
import org.springframework.scheduling.annotation.Scheduled;
import org.springframework.stereotype.Component;

@Component
public class ScheduledMessageSender {

    private static final Logger logger = LoggerFactory.getLogger(ScheduledMessageSender.class);

    private final MessageProducer messageProducer;
    private int counter = 0;

    public ScheduledMessageSender(MessageProducer messageProducer) {
        this.messageProducer = messageProducer;
    }

    // Sends a monitoring message every 30 seconds with cycling routing keys
    @Scheduled(fixedDelay = 30000)
    public void sendMonitoringMessage() {
        // Routing keys representing different device types
        String[] routingKeys = {"monitoring.laptop", "monitoring.phone", "monitoring.tablet"};
        String routingKey = routingKeys[counter % routingKeys.length];
        counter++;

        // Example monitoring message with simulated data
        String message = String.format("Device monitoring data at %d: status OK for %s",
                System.currentTimeMillis(), routingKey);
        logger.info(message);
        messageProducer.sendMessage(routingKey, message);
    }
}
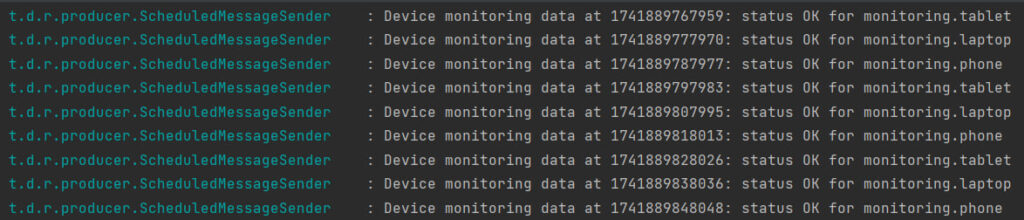
Leveraging the @Scheduled annotation, this component sends monitoring messages at fixed intervals. It cycles through an array of routing keys (such as monitoring.laptop, monitoring.phone, and monitoring.tablet) and sends a message containing dynamic content (like current timestamp and device status) each time it runs.
Consumer Project
Key Components:
RabbitMQConfig.class (Consumer Configuration):
package tech.devblueprint.rabbitmq_consumer_spring_boot_example.configuration;

import org.springframework.amqp.core.Binding;
import org.springframework.amqp.core.BindingBuilder;
import org.springframework.amqp.core.Queue;
import org.springframework.amqp.core.TopicExchange;
import org.springframework.context.annotation.Bean;
import org.springframework.context.annotation.Configuration;

@Configuration
public class RabbitMQConfig {

    public static final String EXCHANGE_NAME = "monitoring.exchange";
    public static final String QUEUE_LAPTOP = "queue.monitoring.laptop";
    public static final String QUEUE_PHONE = "queue.monitoring.phone";
    public static final String QUEUE_TABLET = "queue.monitoring.tablet";

    // Create a topic exchange
    @Bean
    public TopicExchange topicExchange() {
        return new TopicExchange(EXCHANGE_NAME);
    }

    // Create queues for different device types
    @Bean
    public Queue laptopQueue() {
        return new Queue(QUEUE_LAPTOP);
    }

    @Bean
    public Queue phoneQueue() {
        return new Queue(QUEUE_PHONE);
    }

    @Bean
    public Queue tabletQueue() {
        return new Queue(QUEUE_TABLET);
    }

    // Bind queue for laptop monitoring messages
    @Bean
    public Binding bindingLaptop(Queue laptopQueue, TopicExchange topicExchange) {
        return BindingBuilder.bind(laptopQueue).to(topicExchange).with("monitoring.laptop");
    }

    // Bind queue for phone monitoring messages
    @Bean
    public Binding bindingPhone(Queue phoneQueue, TopicExchange topicExchange) {
        return BindingBuilder.bind(phoneQueue).to(topicExchange).with("monitoring.phone");
    }

    // Bind queue for tablet monitoring messages
    @Bean
    public Binding bindingTablet(Queue tabletQueue, TopicExchange topicExchange) {
        return BindingBuilder.bind(tabletQueue).to(topicExchange).with("monitoring.tablet");
    }
}
In the consumer project, this configuration class creates queues for different device types: laptop, phone, and tablet. It also sets up bindings between these queues and the topic exchange using their respective routing keys. This ensures that messages sent with a particular routing key will be delivered to the corresponding queue.
MessageConsumer.class (Message Consumption Service):
package tech.devblueprint.rabbitmq_consumer_spring_boot_example.consumer;

import org.slf4j.Logger;
import org.slf4j.LoggerFactory;
import org.springframework.amqp.rabbit.annotation.RabbitListener;
import org.springframework.stereotype.Service;
import tech.devblueprint.rabbitmq_consumer_spring_boot_example.configuration.RabbitMQConfig;

@Service
public class MessageConsumer {

    private static final Logger logger = LoggerFactory.getLogger(MessageConsumer.class);

    // Listener for laptop monitoring messages
    @RabbitListener(queues = RabbitMQConfig.QUEUE_LAPTOP)
    public void receiveLaptopMessage(String message) {
        logger.info("Received on {}: {}", RabbitMQConfig.QUEUE_LAPTOP, message);
    }

    // Listener for phone monitoring messages
    @RabbitListener(queues = RabbitMQConfig.QUEUE_PHONE)
    public void receivePhoneMessage(String message) {
        logger.info("Received on {}: {}", RabbitMQConfig.QUEUE_PHONE, message);
    }

    // Listener for tablet monitoring messages
    @RabbitListener(queues = RabbitMQConfig.QUEUE_TABLET)
    public void receiveTabletMessage(String message) {
        logger.info("Received on {}: {}", RabbitMQConfig.QUEUE_TABLET, message);
    }
}
This service listens for messages using the @RabbitListener annotation on each queue. When a message arrives in any of the queues, the corresponding method is triggered, and the received message is logged. This helps in monitoring and verifying that messages are being correctly routed and processed.
5. Tests
Run both applications and you will see:

Conclusion
This article demonstrates how to implement messaging between two Spring Boot applications using RabbitMQ.