What are we going to build?

In this tutorial, we will set up a Spring Boot application that integrates with Flyway for seamless database migrations. We’ll use PostgreSQL as our database, running in a Docker container. The API will expose device data stored in the database.
What is Flyway?
Flyway is a database migration tool that helps manage versioned changes to your database schema. It works by applying incremental SQL scripts to modify the structure and keeps track of applied migrations in a special history table (flyway_schema_history).
Flyway follows a simple approach:
- You define migration scripts with versioned filenames (e.g., V1__Create_Table.sql, V2__Add_Column.sql).
- When the application starts, Flyway checks which migrations have already been applied.
- It executes new migrations in order and records them in flyway_schema_history.
An alternative to Flyway is Liquibase. The advantage of Flyway is its simplicity and ease of use, making it ideal for projects with basic migrations where SQL scripts are sufficient. However, Flyway is limited in flexibility and functionality, lacking support for complex migrations via API and rollback, which can be a downside for more complex scenarios.
What will our API do?
GET /devices → Fetch all stored devices
POST /devices → Add a new device to the database
What are we going to use?
- Java 17
- Spring Boot
- 🎯 Flyway – For database version control and migrations
- Spring Data JPA
- PostgreSQL
- Docker
Setting Up PostgreSQL with Docker
First, we need a PostgreSQL instance running locally. We’ll use Docker to set it up.
Pull the latest PostgreSQL image:
docker pull postgres:latest
Run a PostgreSQL container:
docker run --name postgres-container \
-e POSTGRES_USER=admin \
-e POSTGRES_PASSWORD=admin \
-e POSTGRES_DB=devices_db \
-p 5432:5432 \
-d postgres
Creating the Spring Boot Project
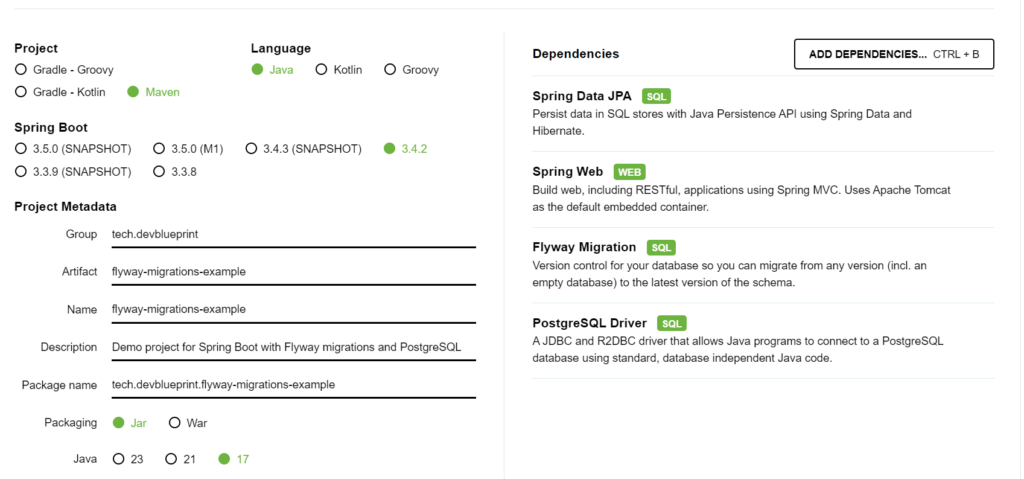
if you haven’t already created a Spring Boot project, you can generate it using Spring Initializr. Select the following dependencies:
- Spring Web – For exposing REST APIs
- Spring Data JPA – For interacting with PostgreSQL
- Flyway Migration – For database version control
- PostgreSQL Driver – For connecting to PostgreSQL
Configuring the Application
Modify application.properties to connect to PostgreSQL and enable Flyway migrations:
spring.application.name=flyway-migrations-example

# Database configuration
spring.datasource.url=jdbc:postgresql://localhost:5432/devices_db
spring.datasource.username=admin
spring.datasource.password=admin
spring.datasource.driver-class-name=org.postgresql.Driver

# Hibernate settings
spring.jpa.hibernate.ddl-auto=none
spring.jpa.show-sql=true

# Flyway settings
spring.flyway.enabled=true
spring.flyway.baseline-on-migrate=true
spring.flyway.locations=classpath:db/migration</div>
<div>
Creating Flyway Migration Scripts
Flyway uses versioned SQL scripts to manage database schema changes. Create a folder for migrations src/main/resources/db/migration
Add an initial migration script V1__Create_Devices_Table.sql:
CREATE TABLE devices (
id SERIAL PRIMARY KEY,
name VARCHAR(100) NOT NULL,
type VARCHAR(50) NOT NULL,
created_at TIMESTAMP DEFAULT CURRENT_TIMESTAMP
);
To add a new column later, create another script V2__Add_Status_Column.sql:
ALTER TABLE devices ADD COLUMN status VARCHAR(20);
When the application starts, Flyway will execute these scripts automatically.
Defining the Device Entity
Create a Device entity that maps to the devices table:
package tech.devblueprint.flyway_migrations_example.entity;

import jakarta.persistence.*;

import java.time.LocalDateTime;

@Entity
@Table(name = "devices")
public class Device {
@Id
@GeneratedValue(strategy = GenerationType.IDENTITY)
private Long id;

private String name;
private String type;
private String status;

@Column(name = "created_at", updatable = false)
private LocalDateTime createdAt;

@PrePersist
public void prePersist() {
this.createdAt = LocalDateTime.now();
}
}
Creating the Repository
Define a repository to handle database interactions:
package tech.devblueprint.flyway_migrations_example.repository;

import org.springframework.data.jpa.repository.JpaRepository;
import tech.devblueprint.flyway_migrations_example.entity.Device;

public interface DeviceRepository extends JpaRepository<Device, Long> {
}
Implementing the Service Layer
Create a service class to handle business logic:
package tech.devblueprint.flyway_migrations_example.service;

import org.springframework.stereotype.Service;
import tech.devblueprint.flyway_migrations_example.entity.Device;
import tech.devblueprint.flyway_migrations_example.repository.DeviceRepository;

import java.util.List;

@Service
public class DeviceService {

private final DeviceRepository deviceRepository;

public DeviceService(DeviceRepository deviceRepository) {
this.deviceRepository = deviceRepository;
}

public List<Device> getAllDevices() {
return deviceRepository.findAll();
}

public Device createDevice(Device device) {
return deviceRepository.save(device);
}
}
Exposing the REST API
Finally, let’s create a REST API to expose our data:
package tech.devblueprint.flyway_migrations_example.controller;

import org.springframework.web.bind.annotation.*;
import tech.devblueprint.flyway_migrations_example.entity.Device;
import tech.devblueprint.flyway_migrations_example.service.DeviceService;

import java.util.List;

@RestController
@RequestMapping("/api/devices")
public class DeviceController {

private final DeviceService deviceService;

public DeviceController(DeviceService deviceService) {
this.deviceService = deviceService;
}

@GetMapping
public List<Device> getAllDevices() {
return deviceService.getAllDevices();
}

@PostMapping
public Device createDevice(@RequestBody Device device) {
return deviceService.createDevice(device);
}
}
Running the Application
Start the Spring Boot application:
mvn spring-boot:run
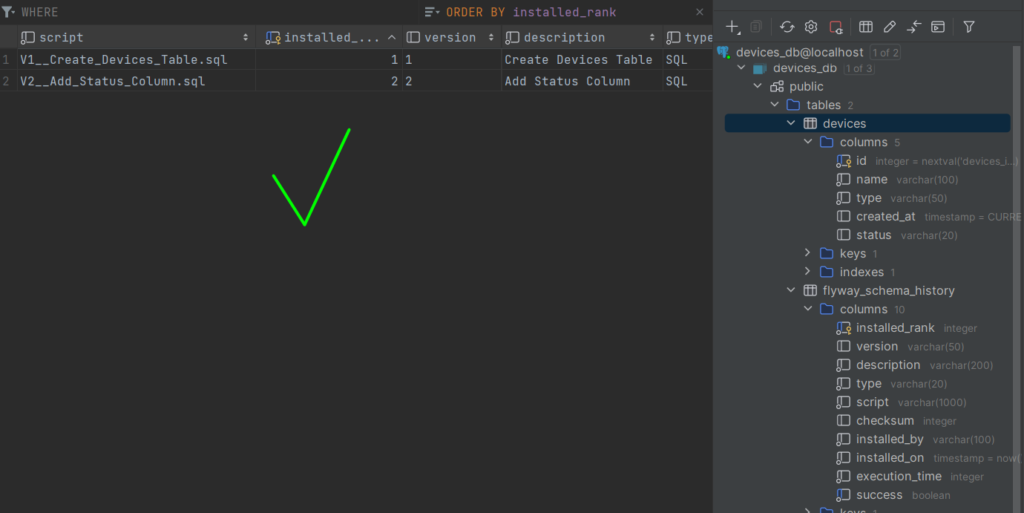
Once you start the application, Flyway will automatically create the necessary tables and apply migrations.
Test API Endpoints,
Get all devices:
curl -X GET http://localhost:8080/api/devices
Add a new device:
 curl -X POST http://localhost:8080/api/devices \
-H "Content-Type: application/json" \
-d '{"name": "Smart Sensor", "type": "Temperature", "status": "Active"}'
Congratulations!
You have successfully set up a Spring Boot application with Flyway and PostgreSQL, complete with database migrations and a REST API. Now you have a solid foundation to manage database versioning in your projects!